

Showing posts with label craft. Show all posts
Showing posts with label craft. Show all posts
Saturday, 12 July 2014


Monday, 21 January 2013
I Heart Pintrest
Addicted to Pintrest at the moment, it is definitely using up an exorbitant amount of my free time, probably ought to try and do some of those craft ideas I have pinned instead of adding more pins.
Anyhoo, thought I would share some of the fab ideas and pins I have come across:


Anyhoo, thought I would share some of the fab ideas and pins I have come across:
Clock that knits a scarf every year
True
Woven plastic bag basket
Just too beautiful
Wow, didn't know that
Fun idea for spring, birds use the wool for their nests
This is so me!
Hope you are having a good start to the week x
Saturday, 19 January 2013
Rose wreath in the shop
Hey everyone, how are you enjoying the weather? I love snow for like a day and then I am all "ok, had enough of this now," (I know so fickle!)
I decided to list my rose wreath in my Etsy Shop. I made it for Christmas initially but I think it would work well for lots of other celebrations throughout the year, particularly Valentine's Day which is fast approaching.
I enjoyed making the wreath so much that I am pretty sure I will want to make another one next year. I don't have room to store a wreath from every Christmas so thought selling it would be a perfect solution to the problem of little storage and and insatiable urge to create!
It's for sale at £23.63 (US $35.00) plus postage and could be hanging prettily from your own door or wall in 3 working days!


Hope you are all well, life is pretty slow with me, Orren is doing well and not far off 1 year old! Can't believe where the year has gone. He is crawling now and trying so hard to stand. He is filling my life with so much joy and contentment he is just such a delight, I really can't imagine not having him around. Of course there are downs as well as ups, life can be hard work at times and I get sick of the mundanity and repetition sometimes but the goods far outweigh the bads.
Any other crafting mums out there? How do you manage to find time for creating? I was thinking of changing the name of this blog to "things I made while the baby was sleeping".
Hope you are all having a wonderful weekend and if you are in the UK then hope you are enjoying the snow.
Hels
x
I decided to list my rose wreath in my Etsy Shop. I made it for Christmas initially but I think it would work well for lots of other celebrations throughout the year, particularly Valentine's Day which is fast approaching.
I enjoyed making the wreath so much that I am pretty sure I will want to make another one next year. I don't have room to store a wreath from every Christmas so thought selling it would be a perfect solution to the problem of little storage and and insatiable urge to create!
It's for sale at £23.63 (US $35.00) plus postage and could be hanging prettily from your own door or wall in 3 working days!
Hope you are all well, life is pretty slow with me, Orren is doing well and not far off 1 year old! Can't believe where the year has gone. He is crawling now and trying so hard to stand. He is filling my life with so much joy and contentment he is just such a delight, I really can't imagine not having him around. Of course there are downs as well as ups, life can be hard work at times and I get sick of the mundanity and repetition sometimes but the goods far outweigh the bads.
Any other crafting mums out there? How do you manage to find time for creating? I was thinking of changing the name of this blog to "things I made while the baby was sleeping".
Hope you are all having a wonderful weekend and if you are in the UK then hope you are enjoying the snow.
Hels
x
Saturday, 29 December 2012
Christmas wreath
I forgot to share with you some photos of the Christmas wreath I made, it was one of my advent calender activities.
It was so easy to make, I simply wrapped a polystyrene ring in thick hemp twine and some red ribbon, then glued on some white and red felt roses that I made by cutting a circle of the felt into a spiral and winding it up keeping one side flat.


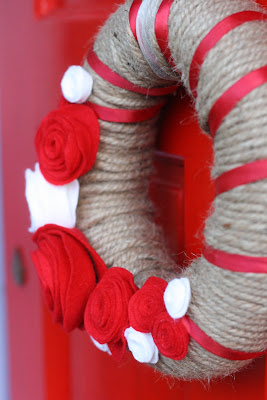

It was so easy to make, I simply wrapped a polystyrene ring in thick hemp twine and some red ribbon, then glued on some white and red felt roses that I made by cutting a circle of the felt into a spiral and winding it up keeping one side flat.


Sunday, 16 December 2012
My advent calander
I know it is too late to share this calender as a tutorial or anything, but I thought I would share it anyway just to show I do follow things through!


In each of the envelopes is an activity to do on that day. I can't say I have stuck to it rigidly because I didn't want to stress myself out with it at probably the most stressful time of the year.
These are the activities from the list:
1st – Saturday - Photograph Orren in his
Christmas outfit
2nd – Sunday – Make Christmas gift wish list
3rd – Monday – Design and make lino cut for
Christmas cards
4th – Tuesday – Print Christmas cards
5th – Wednesday – Write Christmas cards
6th – Thursday – Post Christmas cards
7th – Friday – Drink spiced cider
8th –Saturday – Bring in the Christmas tree and
decorate it
9th – Sunday – Do a Christmas puzzle
10th – Monday – Get Christmas books out of the
library for Orren
11th – Tuesday – Make a gingerbread house
12th – Wednesday – Buy a Christmas scrap
book
13th – Thursday – Make a Christmas wreath
14th – Friday – Watch “it’s a Wonderful Life”
15th – Saturday – Buy new pyjamas for Christmas
morning
16th – Sunday – Make a Christmas tree ornament
17th – Monday – Make mince pies
18th – Tuesday – Wrap Christmas presents
19th – Wednesday - Make hot chocolate with a
candy cane stirrer
20th – Thursday – Make Christmas place mats
21st – Friday – Make Christmas stockings
22nd – Saturday – Have a candle lit meal
23rd – Sunday – Drink mulled wine
24th – Monday – Go to crib service at Church,
read the night before Christmas
Shopping list:
I made the calender by making my own envelopes from Christmas scrap booking paper the used a typewriter to type the activities on corresponding paper. I mounted the envelopes on a piece of mount board which I covered with brown wrapping paper glues down with a pritt stick, I glues a little peg to the mount board with attached each envelope to the board with this. I made a little number on each envelope by gluing brown wrapping paper to thin card the drawing round the lid of the pritt stick and cutting it out. I then drew on the number and glued them to the envelope.
As for me, I am happily getting ready for Christmas and enjoying my lovely little boy who is getting bigger everyday, I can hardly keep up. He crawls now and can pull himself up to standing, he is charming.
Hope you are all good and enjoying the festive season.
Friday, 16 November 2012
Advent Calendar Ideas
This year we are planning on having a really special Christmas at home with our new little family. It will be our first Christmas spent at home together and Orren's very first Christmas, we want it to be really special and lovely, I also want it to be as stress free as possible which is why I am already thinking about it, as it is creeping up quickly. Everyone's Christmas usually begins with a count down, often a gaudy cardboard calender filled with cheap chocolates and decorated with a tacky kids cartoon character, not very festive in my opinion, so this year I have decided to make my own. Pintrest provided me with myriad ideas and I am pretty set on the idea of having pockets, I was initially thinking I could make a fabric calendar with large pockets to hold a tasty chocolate, but now I am thinking of making paper envelopes and putting a little fun, festive Christmas activity idea in each, I think this is more fun and thoughtful.
Here are some of the fab advent calendars I saw on Pintrest, honestly I could make any one of these, they area all so it is so hard to make a decision.
Really like the use of burlap on this one, it is a simple design which I think I could manage,

Love the idea of stringing little envelopes across a large picture frame,

There intricately decorated envelopes are so beautiful but I think this could be a bit expensive for my budget,

Love the idea of hanging little gifts of a branch, or tree, I have some driftwood branches that would work really well with this idea,

I like the simplicity of this design, but I would probably make my own envelopes with Christmassy paper of vintage music sheet,

I like the idea of using pegs to hold gifts or envelopes, but I am not sure what I would glue the peg to?

Another fun design with beautifully decorated paper envelopes, this one is probably more realistic for me to make as there are less embellishments,

I like this simple design, it has a sort of Shaker/ New England feel that I love,

Lace and doilies!! Need I say any more?

Another simple envelope design,

I like the idea of using little boxes and decorating the lids with Christmassy paper, but I am not sure where I would get 24 little boxes from without spending money I don't have!

What do you do Advent Calendar wise for Christmas? Have you made your own? What did you do?
Friday, 27 July 2012
Re-usable wet wipes tutorial
If there is one thing that most parents seem to not be able to live without then it has to be wet wipes. I often hear other mothers lamenting the cost of nappies, formula and wet wipes and I smile smugly to myself and think how glad I am that I am not having to spend money on two out of those three essentials.
Don't get me wrong, I am no saint, I was using cotton wool and water for this first five months of my son's life, but I realised the error of my ways and that I needn't be filling up our dustbins with yet more detritus, that, although admittedly will eventually bio-degrade, will take a long time under all that plastic. So in order to eliminate that little bit extra waste I decided I could make my own wet wipes. This idea struck me after reading the chapter about babies in The Self-sufficientish Bible, they suggest cutting up polyester fleece to use as wipes, but seeing as I had a lot of cotton flannelette left from the neckerchief/bandanna bibs I thought this would be a better material. Not only is cotton more natural that synthetic fleece, but I figured it might also be more absorbent.

To begin with I tore up my flannelette into long strips which were the width of a sheet of toilet tissue. I then cut these strips into smaller toilet tissue sized rectangles. Initially I thought to make them wet-wipe sized, but decided that toilet paper size was sufficient, and should I decide they ought to be bigger in future I could just make more.


Don't get me wrong, I am no saint, I was using cotton wool and water for this first five months of my son's life, but I realised the error of my ways and that I needn't be filling up our dustbins with yet more detritus, that, although admittedly will eventually bio-degrade, will take a long time under all that plastic. So in order to eliminate that little bit extra waste I decided I could make my own wet wipes. This idea struck me after reading the chapter about babies in The Self-sufficientish Bible, they suggest cutting up polyester fleece to use as wipes, but seeing as I had a lot of cotton flannelette left from the neckerchief/bandanna bibs I thought this would be a better material. Not only is cotton more natural that synthetic fleece, but I figured it might also be more absorbent.


Next I stitched round each edge with a wide zig-zag on the sewing machine. I don't think that this step is essential, but I thought it might make them last a bit longer as it will stop them fraying in the wash.

Then just keep going until you have as many as you need. I must have made about 50 initially, but may make more depending on how many I get through in a day.

To store them I put mine into a plastic tupperware type box with a slosh of water to keep them moist. You could also add a few drops of something like grape seed oil which is the only other ingredient in waterwipes, or soak the water in chamomile tea before putting the wipes in.

Better for your pocket and better for baby's bottom too because they don't contain any of the nasty chemicals found in commercial wet-wipes.
Once used place them into another plastic container with a tight lid which will not only keep in any smell but will keep them moist making them easier to wash. (much harder to get out dried on poo than the soft wet stuff) You can wash them as you would washable nappies. I will be washing them at 30 degrees with Bio D Laundry Liquid.

Thursday, 26 July 2012
Neckerchief/Bandanna bib tutorial
Have you seen there sweet bibs you can get now that look like neckerchiefs?! I think they are really cute and much more fun that an ordinary bib, it makes the bib part of the baby's outfit rather than just covering it up for the sake of dribble protection.
I was on the verge of buying some when I suddenly remembered that I can sew, and have half a brain #9the other half went out with the placenta!) and therefore could make some myself.
What's more I though I could share it with you so you can have a go at making one for your baby if you have one, or as a gift for a friend with a new addition.
It is dead easy to make one of these bibs, as I am sure you know by now I don't really do measuring, so haven't included any, all lengths are by rack of eye! (Or by what I figure will fit round a baby's neck.)
For this tutorial you need two types of fabric, I used a flannelette type cotton which I figured would be fairly absorbent, then a patterned jersey type fabric for the front.
Begin buy making a paper template for the shape you want, I loosely wrapped mine around my baby's neck to get an idea of the size and included enough room for hemming.


I was on the verge of buying some when I suddenly remembered that I can sew, and have half a brain #9the other half went out with the placenta!) and therefore could make some myself.
What's more I though I could share it with you so you can have a go at making one for your baby if you have one, or as a gift for a friend with a new addition.
It is dead easy to make one of these bibs, as I am sure you know by now I don't really do measuring, so haven't included any, all lengths are by rack of eye! (Or by what I figure will fit round a baby's neck.)
For this tutorial you need two types of fabric, I used a flannelette type cotton which I figured would be fairly absorbent, then a patterned jersey type fabric for the front.
Begin buy making a paper template for the shape you want, I loosely wrapped mine around my baby's neck to get an idea of the size and included enough room for hemming.

Pin the template to the fabric then cut around it.

Next pin the flannelette to the jersey and cut around it as before so you have two triangles of the same shape and size.

Keeping the fabric pinned together sew the two pieces together using a straight stitch. Leave about 1 cm for hemming.

Make sure you leave a small gap of about 3cm to turn your bib the right way round. I left one of my corners open.

Next trim off the excess from the edges so they are nice and neat:

Then turn the bib the right way round through the small hole you left at one end:

It should look like this now:

Now to finish off tuck in the un-hemmed edges on your open corner like this:

Then simply sew a straight line over this edge (you could do a chain stitch by hand if you so felt inclined, I am a bit lazy though and want to get it done quickly, so it was just a straight stitch for me.)

Now you need to add some velcro. Cut a piece about 3 cm long and pin one piece to either side of your bib:

Sew them with a straight stitch and you are done!

Hope you are all having a great week, I am writing this tutorial in my garden because we finally have some sun in the UK!
Saturday, 21 July 2012
made a button bouquet!
After being sooo inspired by THIS button bouquet I saw at a wedding and seeing all THESE beautiful bouquets made by the same lovely lady I decided to have a go at making my own button bouquet. My mum had a stash of buttons that she was keen to be used up and I had a pile of wire left over from the table settings at my wedding, so I though why not give it a go (according to Google analytics they are a rising trend!!). I looked up a tutorial for how to make a stem then just went from there really, I made 50 in the end and then stopped. So for about the past two months I have had 50 of these stems lying about the house and finally this week I bundled them all together and finished off the bouquet with some pretty lace and tulle netting. What do you think, not bad for a first attempt even if I do say so myself. Which is why I have put it for sale here, and here and here. Who knows, if it sells I might even make another one!
What do you think?


What do you think?
Subscribe to:
Posts (Atom)